As per AWS documentation , AWS Transfer for SFTP is a fully managed service that enables the transfer of files directly into and out of Amazon S3 using the Secure File Transfer Protocol (SFTP)—also known as Secure Shell (SSH) File Transfer Protocol. for companies moving their SFTP operations into cloud this can be a good solution.
Follow this amazon documentation first to better understand the technical details
- Create AWS Transfer for SFTP
- Create S3 bucket (with default encryption) to be used by users to ftp files
- Create IAM role to be assumed by SFTP users
- Create SFTP User
- Create SSH Key and associate with user account.
Complete aws sftp terraform code for AWS Transfer for SFTP is available on Github
Step by step explanation of the solution and pre-requisites.
Pre-requisites
- Terraform knowledge
- Terraform workspaces knowledge
- aws sftp knowledge.
- Your aws role used to run this terraform code should have following permissions
- S3 full permissions to be able to create bucket and prefix (folder) inside the bucket.
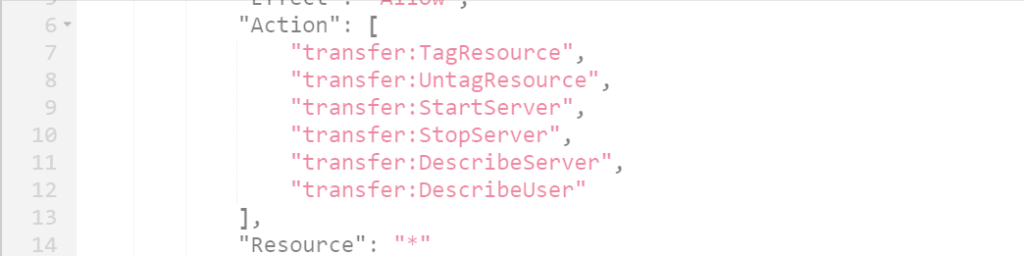
- full permissions on “transfer”
- and transfer specific permissions
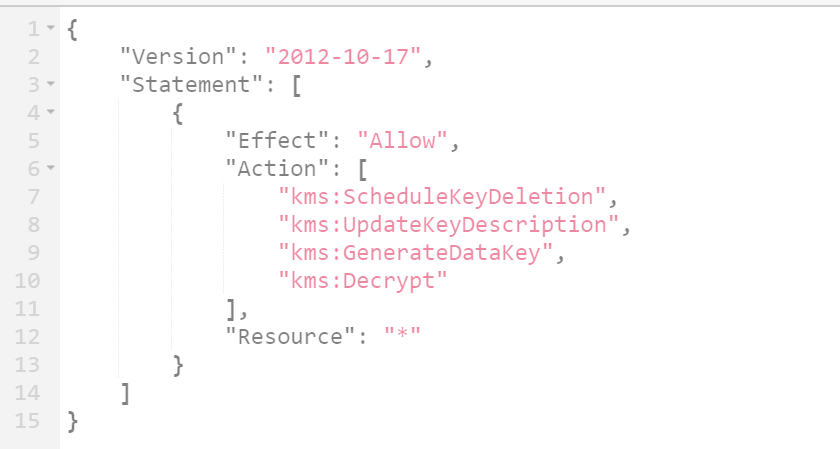
- KMS Permissions
- kms permissions if you are going to use KMS encryption for your S3 bucket
- There are several resources being created as part of this AWS SFTP Terraform example project and lets go through one by one
- sftp.tf file
- Creates IAM role for the SFTP user
- Creates IAM policy and attach to the role
- Creates transfer server itself
- Creates prefix ( folder ) in S3 bucket for the new user account, it is best practice to use same naming convention to your sftp user name and S3 folder. each user account will have their dedicated folder in the SFTP s3 bucket
- Create SSH key using puttyGen and attach to the user account using terraform
- s3.tf file
- Create S3 bucket which will be a container for all the user accounts, depending on the usecase you can have different buckets for different users as well. for simplicity I am using same bucket for all user accounts.
- Create KMS key in case if you wanted to encrypt bucket with “aws:kms” encryption , in this example i am using AES256 encryption.
- Block public access to this bucket and also enable versioning on the bucket.
- variables.tf
- this file contains all workspace variables including tags, bucket name, prefix name, etc.
Run the terraform code as per the instruction from the readme file from the repository and log into Console and check if AWS Transfer for SFTP is created.
Note that this project creates one sftp user, to create more users, you will have to change variables and re-run the sftp.tf file.
Let’s look into terraform AWS transfer for SFTP example in details , first step is to create IAM service role with right permissions.
Step #1
Service role is a A role that a service assumes ( in this case AWS SFTP) to perform actions in your account on your behalf. Service requires a trust entity to assume the role, in this case it is “transfer.amazonaws.com”
Basic permissions we need for this Service role are S3 read and write permissions so the SFTP service can put objects into S3 buckets when received from external clients.
resource "aws_iam_role" "sftp_role" {
  name = "tf-test-transfer-server-iam-role-${local.workspace_env}"

  assume_role_policy = <<EOF
{
    "Version": "2012-10-17",
    "Statement": [
        {
        "Effect": "Allow",
        "Principal": {
            "Service": "transfer.amazonaws.com"
        },
        "Action": "sts:AssumeRole"
        }
    ]
}
EOF
}

#Set SFTP user permissions.
resource "aws_iam_role_policy" "sftp_policy" {
  name = "tf-test-transfer-server-iam-policy-${local.workspace_env}"
  role = aws_iam_role.sftp_role.id

  policy = <<POLICY
{
    "Version": "2012-10-17",
    "Statement": [
        {
        "Sid": "AllowFullAccesstoCloudWatchLogs",
        "Effect": "Allow",
        "Action": [
            "logs:*"
        ],
        "Resource": "*"
        },
        {
			    "Effect": "Allow",
          "Action": [
            "s3:ListBucket",
            "s3:GetBucketLocation"
          ],
         "Resource": [
            "arn:aws:s3:::${local.sftp_bucket_name}"
          ]
        },
        {
          "Effect": "Allow",
          "Action": [
            "s3:PutObject",
            "s3:GetObject",
            "s3:DeleteObject",
            "s3:DeleteObjectVersion",
            "s3:GetObjectVersion",
            "s3:GetObjectACL",
            "s3:PutObjectACL"
          ],
          "Resource": [
            "arn:aws:s3:::${local.sftp_bucket_name}/${local.sftp_user}/*"
        ]
      }
    ]
}
POLICY
}
Step #2
In step is to create Transfer server itself. It is simple ans straight forward, all we need is assign role and provider type.
resource "aws_transfer_server" "sftp_server" {
  identity_provider_type = "SERVICE_MANAGED"
  logging_role           = aws_iam_role.sftp_role.arn

  tags = {
    Name        = "tf-acc-test-transfer-server-${local.workspace_env}"
    environment = local.environment
    Owner       = var.owner_name
  }
}
Step #3
Next step is to create a S3 folder ( prefix ) , each SFTP user requires a separate folder so that we can keep files from each client ( user) in separate folders.
#create a folder for the user in S3 bucket which was previourly created. ( not part of this code )
resource "aws_s3_bucket_object" "s3_folder" {
  depends_on = [aws_s3_bucket.b]
  bucket     = local.sftp_bucket_name
  #bucket       = "sftp-bucket-ny2"
  key          = "${local.sftp_user}/"
  content_type = "application/x-directory"
  //  (Optional) Specifies the AWS KMS Key ARN to use for object encryption. This value is a fully qualified ARN of the KMS Key.
  #kms_key_id = "${var.kms_key_arn}"
}
Step #4
Next step is to create a user account based on the folder we just created.
#create sftp user
resource "aws_transfer_user" "ftp_user" {
  depends_on     = [aws_s3_bucket.b]
  server_id      = aws_transfer_server.sftp_server.id
  user_name      = local.sftp_user
  role           = aws_iam_role.sftp_role.arn
  home_directory = "/${local.sftp_bucket_name}/${local.sftp_user}"
}
Step #5
Final step is to create SSH key for the user and upload using terraform . creating SSH key itself is not part of this example, assume you already done it outside of this terraform project and copy it here.
#SSH key for user to manage sftp account
#Generate SSH key using PuttyGen
resource "aws_transfer_ssh_key" "ssh_key" {
  server_id = aws_transfer_server.sftp_server.id
  user_name = aws_transfer_user.ftp_user.user_name
  body      = "ssh-rsa AAAAB3NzaC1yc2EAAAABJQAAAQEApjf+e/na2t1iIX2mSSyR3ll5VrlpxHS8THx9PIOPnoNXC5y4ERS7tJ/n50RiS6y9QiGKl0dDQvCaIVL0Ydj3NSYENKKYZ694vwro0uCH8FgmUEaofqWT9gogCsdj1SRLVhHzLub7Yqt4iFcXlM3RvMTUl0bwjowe5yyiWWKJL3ycwC+USEDgL1vsyS7zm4RcyC/FIn6oKoc/Y5rfoR+WWBLnSU8L1605sE4X/Z2GGb4JQj4VlopmBXLW9CyST5eXb0U5FU6+nL30fZVpgFim0IpBj4hCYyTClxwztl1WW9jmiCRM2JPdbv5TazJC1wxPx6NJDqrVmmcxClpLy3q+oQ== rsa-key-20200405"
}
This project uses Terraform workspaces which helps avoiding code redundancy , to understand the concept better refer to my article