Let’s create an AWS Transit Gateway Hub and Spoke model using isolated VPCs and a Shared Services account (Hub). We are going to use Resource Access Manager ( RAM) to share the gateway with other accounts (Spoke) and create a network based on Hub and Spoke model topology.
I am assuming you are familiar with the disadvantages with VPC peering and knew the basics of AWS Transit gateway and its advantages.
Refer to this AWS documentation to understand the AWS Transit Gateway Hub and Spoke concepts before going further with this example.
Now let’s look into a complete AWS Transit gateway example along with terraform code.
Shared Services Account :
A shared services account (vpc) which is critical for your organization where you can create common and reusable resources such as Cloud watch alerting, SES / SNS monitoring & Active Directory Services, and you can host apps , API’s that are shared across multiple accounts and VPC’s
Usecase:
- Implement Transit Gateway in a shared services account.
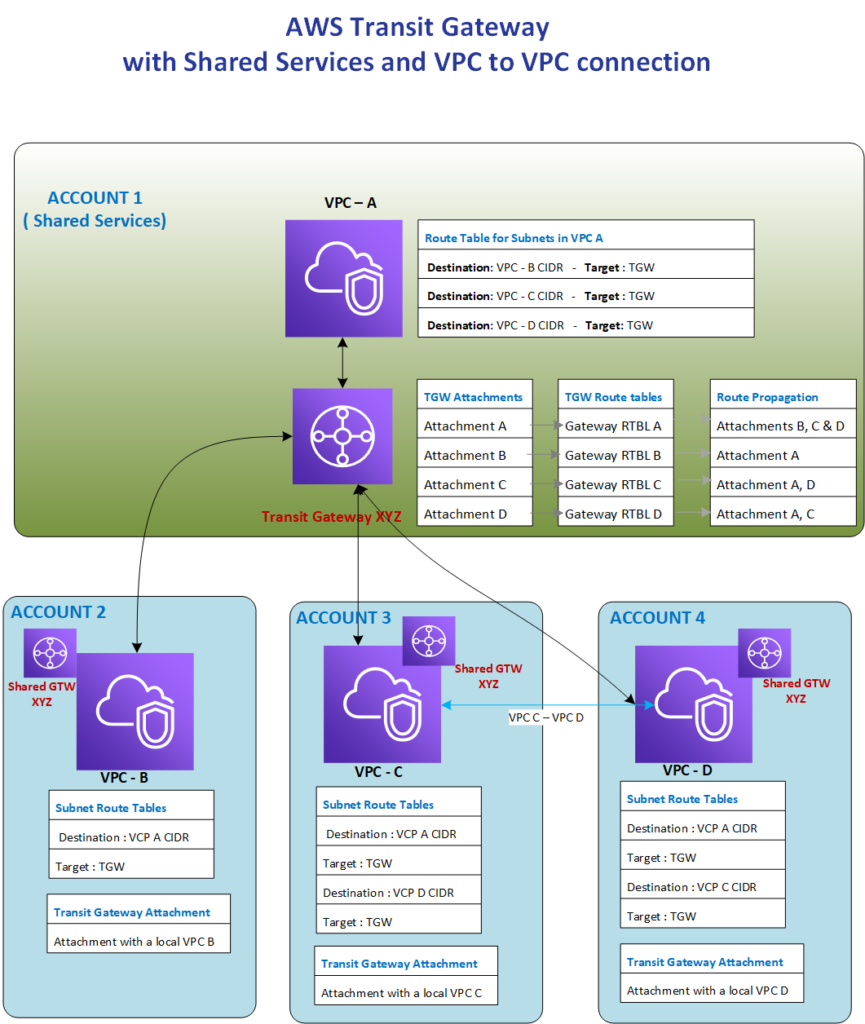
- All VPC’s from different accounts are connected to Transit Gateway (TGW) using Hub and Spoke topology.
- Accounts 3 & 4 are connected to each other (through TGW)
- All other accounts except 3 & 4 are isolated from each other.
- TGW from Account #1 is shared with all other accounts using RAM ( Resource Access Manager).
Architecture Diagram :
Implementation Steps :
- Create Transit Gateway in Shared Services Account ( account # 1) , following are all the AWS resources that will be created.
- Transit Gateway
- Transit Gateway Attachments – one attachment per one VPC
- Transit Gateway Route table and Route table association with Attachment
- Transit Gateway Route table propagation
- Create Resource Access Manager in Shared Services Account
- Share Transit Gateway with a Receiver account
- Share Transit Gateway with a Receiver account
- Accept resource and Create a Attachment in the Receiver Account ( Account # 2)
- Accept Shared Transit Gateway
- Create a Transit Gateway Attachment with a VPC from the receiver account
- Back to Shared Services Account
- The attachment from the Receivers account will be propagated to Shared services account automatically.
- Create Transit Gateway Route table Propagation for the new TGW attachment with routes to desired Shared services VPC’s
- Add TGW to VPC route tables – note that this is route tables for vps / subnets.
- Create EC2 instances in VPC A and VPC B and use telnet to test the connectivity.
- Connect Account 3 and Account 4 through GTW (not isolated VPC’s)
Terraform code for each step with explanation.
Step #1
Create Transit Gateway in Shared Services Account ( account # 1)
resource "aws_ec2_transit_gateway" "transit_gateway" {

  description                     = "TEST-TGW-HUB-SPOKE"
  amazon_side_asn                 = "v65514"
  default_route_table_association = "enable"
  default_route_table_propagation = "enable"
  auto_accept_shared_attachments  = "enable"
  vpn_ecmp_support                = "enable"
  dns_support                     = "disable"

  tags = {
    Name       = "TEST-TGW-HUB-SPOKE"
    "app-name" = "App Name"
  }
}
Create Transit Gateway Attachment in Shared Service Account , create a VPC and a private subnet prior to running this terraform code.
#Attach Transit Gateway to ANY vpc
resource "aws_ec2_transit_gateway_vpc_attachment" "transit-gateway-attachment" {
  subnet_ids                                      = flatten(var.subnet_ids)
  transit_gateway_id                              = aws_ec2_transit_gateway.transit_gateway.id
  transit_gateway_default_route_table_association = false
  transit_gateway_default_route_table_propagation = false
  vpc_id                                          = var.vpc_id
  dns_support                                     = "disable"

  tags = {
    Name       = "TEST-TGW-HUB-SPOKE-ATTACH-1"
    "app-name" = "App Name"
  }
}

variable "subnet_ids" {
  type        = list(string)
  description = "list of subnet id's from the given VPC - Use one subnet from each AZ"
  default = ["subnet-1234", "subnet-abcd"] # just one subnet used for testing
}

variable "tgw_vpc_id" {
  description = "Please provide VPC id where transitgateway is being creted"
  default     = "vpc-023232"
}
Create Transit Gateway Route table for the attachment – Shared Services Account
#route table and association not required for shared account.
#Rout table 1 for the VPC
resource "aws_ec2_transit_gateway_route_table" "rtbl" {
  transit_gateway_id = var.tgw_id
  depends_on =[aws_ec2_transit_gateway_vpc_attachment.transit-gateway-attachment]
  tags = {
    Name       = "TEST-TGW-HUB-SPOKE-ATTACH-1-RTBL"
    "app-name" = "App Name"
  }
}
Create Transit Gateway Route table Association for the attachment – Shared Services Account
#Route table 1 asociation
resource "aws_ec2_transit_gateway_route_table_association" "association" {
  depends_on =[aws_ec2_transit_gateway_vpc_attachment.transit-gateway-attachment]
  transit_gateway_attachment_id  = aws_ec2_transit_gateway_vpc_attachment.transit-gateway-attachment.id
  transit_gateway_route_table_id = aws_ec2_transit_gateway_route_table.rtbl[count.index].id
}
Create Transit Gateway Route table Propagation for the attachment – Shared Services Account
#Route table 1 asociation
resource "aws_ec2_transit_gateway_route_table_association" "association" {
  depends_on =[aws_ec2_transit_gateway_vpc_attachment.transit-gateway-attachment]
  transit_gateway_attachment_id  = aws_ec2_transit_gateway_vpc_attachment.transit-gateway-attachment.id
  transit_gateway_route_table_id = aws_ec2_transit_gateway_route_table.rtbl[count.index].id
}
Now we have completed first step #1 , which involves creating a transit gateway, creating the attachment with a VPC from the same shared services account and associating a transit gateway to the route and route propagation.
If you like to connect more than one VPC to the TGW from the same Transit gateway shared services account, then please repeat the step #1.
Step #2
Lets move on to the Step #2 which is Sharing the TGW with another AWS account using AWS Resource Access Manager ( RAM) in the Shared Services Account ( Account #1) .
# Create Resource Share using RAM - Share TGW with another account number

resource "aws_ram_resource_share" "TGW" {
  name = "TES-RAM-TGW"

  allow_external_principals = true
  tags = {
    Name       = "TEST-RAM-TGW"
    "app-name" = "App Name"
  }
}

#aws_ram_principal_association
resource "aws_ram_principal_association" "ram_principal" {
  # receiver account number
  principal          = var.account_number
  resource_share_arn = aws_ram_resource_share.TGW.id
}

#aws_ram_resource_association
resource "aws_ram_resource_association" "ram_associaiton" {
  # ARN of the TGW to be shared.
  # example arn : arn:aws:us-east-1-1:xxxxxxx:transit-gateway/tgw-jkl89kjdj9
  resource_arn       = var.tgw_arn
  resource_share_arn = aws_ram_resource_share.TGW.id
}

#variables.
variable "tgw_arn" {
  description = "Please provide Transit Gateway ARN"
  type        = string
}

variable "account_number" {
  description = "Please provide resource sharing account number"
  type        = string
}
Step #2 is complete, now lets login to Receiver Account and Accept the Shared Resource ( TGW)
Step #3
Accept the Resource shared in the Receiver Account and create a Transit Gateway Attachment there with a VPC from that account. the goal is to connect the VPC from Shared services account with a VPC from the Receiver account.
#Accept the shared resource.

resource "aws_ram_resource_share_accepter" "receiver_accept" {
  share_arn = var.share_tgw_arn
}

#variables
variable "share_tgw_arn" {
  description = "Please provid Shared TGW ARN"
  type        = string
  default     = "arn:aws:ram:us-east-1:xxxxxx:resource-share/hhkkj-hkjhk-eee"
}

#Create attachment
#refer to step 1 for the terraform code to create attachment, replace VPC id, subnet id's from receiver account
After the creating the gateway attachment in the Receiver account, the same attachment will be propagated automatically to the Shared services account. at the same time it creates a TGW default route table for the attachment.
Step # 4
Back to Shared Services account and complete the route propagation between Shared services account (the Hub) and the Receiver account ( Spoke). we are referring to Transit Gateway Route tables and do not get confused with Subnet route tables.
# Routes Table propagation from Shared Services to Receiver account
resource "aws_ec2_transit_gateway_route_table_propagation" "propagation1" {
  transit_gateway_attachment_id  = var.gtw_attachment_id #attachment of receiver vpc
  transit_gateway_route_table_id = var.rtbl_id # route table associated with the above attachment
}

# Routes Table propagation from Receiver Account to Shared Services account
resource "aws_ec2_transit_gateway_route_table_propagation" "propagation2" {
  transit_gateway_attachment_id  = var.gtw_attachment_id # attachment of shared service vpc
  transit_gateway_route_table_id = var.rtbl_id # route table associated with the above attachment
}
So far we completed the setting up of transit gateway and connecting VPC A from Account 1 with VPC B from Account 2.
Now lets look into VPC / Subnet route tables configuration to allow the traffic from Transit Gateway flow into each Subnet.
Do not get confused with VPC route tables with Transit Gateway route tables.
Step #5
Go to your subnet from VPC A and select the route table and add Transit gateway to the route table , Destination IP should be CIDR block of VPC B, if you VPC B has more than one CIDR block then you need to add multiple routes to the route table
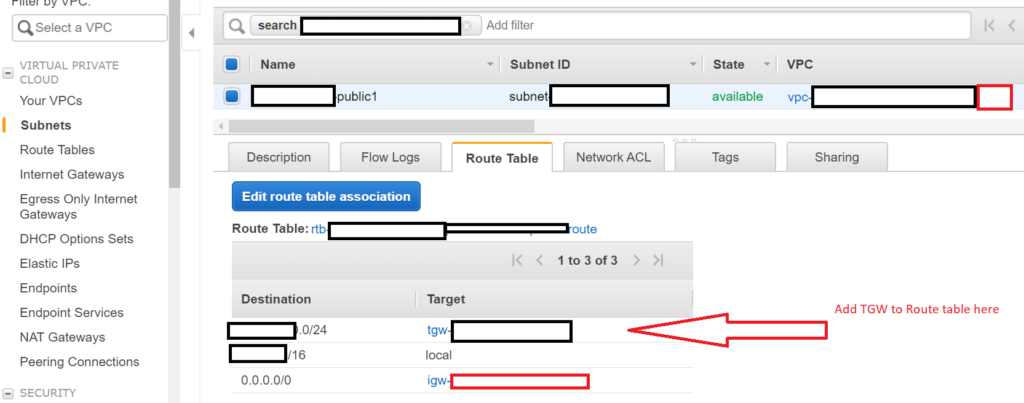
Next go to Subnet of VPC B and make a similar changes, this time Destination IP is the CIDR block of VPC A. the Target is same TGW for both routes which was created as part of Step #1.
Here is sample terraform code for the route table configuration.
#get route table id and CIDR blocks from VPC
data "aws_vpc" "vpc-1-data" {
  id = var.vpc_id1
}

#Add TGW route to VPC 1
resource "aws_route" "vpc_1_routes_to_tgw-sub1" {
  count = length(data.aws_vpc.vpc-1-data.cidr_block_associations)
  # main route table may not work in all the scenarios, use variable to input route table id of your choice.
  route_table_id         = data.aws_vpc.vpc-1-data.main_route_table_id
  destination_cidr_block = data.aws_vpc.vpc-1-data.cidr_block_associations[count.index].cidr_block
  transit_gateway_id     = aws_ec2_transit_gateway.transit_gateway.id
}
Route tables configuration is complete for both VPC’s and now lets create two EC2 instances one in each VPC and try connecting to each other using Telnet.
If you want to use browser based SSH connection to test ( as shown in the below screenshot) , use public Subnet and public IP address for the EC2. you can also have one Subnet ( from VPC A) public and one Subnet ( from VPC B) private. since traffic is slowing from Subnet from Subnet through TGW, we don’t need a public IP on both sides.
Step #6
Create EC2 instances in each subnet , select free Linux image and enable “Auto-assign Public IP” option on Configure Instance page , this will make it easier to test the connection from AWS EC2 console without having to worry about keys and putty tool. – as seen in the below screenshots.
After launching both instances in each VPC , go to VPC A EC2 console and select the check box next to the instance and click on Connect button
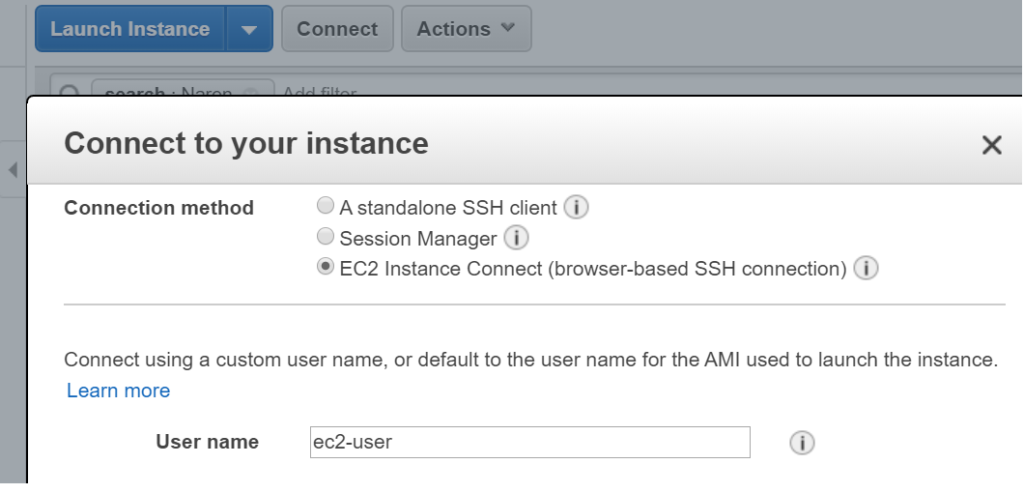
Select Browser based SSH connection and you should see a new browser window with SSH connection to the EC2 instance
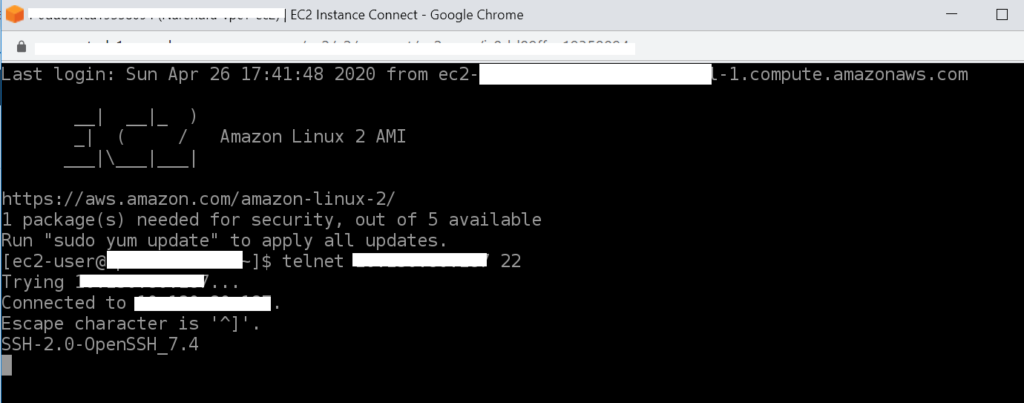
let’s find the private IP of VPC B EC2 instance and try to telnet , install tenet on the instance before running the command.
as you see below , I am able to telnet from VPC A to VPC B, similarly login to EC2 from VPC B and verify that you are able to telnet from VPC B into VPC A.
Troubleshooting connection issues
if you are having connection issues with telnet there are two obvious reasons, check below configurations again and make sure you follow the steps outlined above.
- Transit gateway route table route propagation’s are wrong
- Subnet route table configurations are wrong
Step #7
This step involves repeating some of the above steps to connect routes from a VPC from Account 3 to a VPC in the account 4.
It involves two things.
- Configure TGW route tables to add route propagation’s to flow traffic from GTW attachment 3 into Attachment 4 and from Attachment 4 into Attachment 3. – Refer to Step # 4
- Configure Subnet route tables ( VPC level) so the traffic from VPC C can communicate with VPC D. – Refer to Step #5
Opportunities for Improvement:
Right now we have five steps to complete Transit gateway configuration between Hub and spoke VPC’s and by using terraform assume role, we can cut this down to two steps and it eliminates going back and forth between the accounts .
Ideally this process could have done in two steps
- Create TGW In Hub account and configure attachment, routes
- Create Resource share ( Hub account) , accept resource ( Receiver account), create attachment(Receiver account) and routes ( Hub) all together using IAM assume role. in this step you will be dealing two different accounts from a single terraform source repository.
References :
Refer to this Amazon documentation on creating the Transit Gateway Hub and Spoke model with Resource Access Manager.
You can also follow this youtube video which details similar approach except that in this video author talks about the vpc to vpc connection with in the same account. and also he is missing out on explaining subnet route table configurations, however overall very good video to follow especially for newbies
Refer to my other article on setting up AWS Directory Service with complete configurations and terraform code
Thank you. feel free to ask any question or leave a comment.
Hello i think there’s a problem in step4 it’s the same code duplicated
Hello rui, it is the same code but the argument values (attachment id, and CIDR blocks) will be different , we are connecting two different VPC’s in a two directional way. first block of code is to connect vpc 1 to vpc 2 and second block is to connect vpc 2 to vpc 1 ( for two way connection ) . otherwise will data will flow one way only.